How Do I Know if I’m Engaging My Core?

GLP-1 Woman performing crunches

A question that comes up often in my training practice, and one I hear women ask across different fitness spaces, is, “How do I know if I’m actually engaging my core?”

It’s a fair question. The phrase “engage your core” is used in almost every type of exercise, yet most people aren’t entirely sure what it means or how to do it.

If you’re new to movement, it can feel confusing or even a little intimidating. However, with a few simple steps, you can learn how to “find” your core, what it should feel like, and why it matters.


The Core, by Definition

When we say “core,” most think “six-pack abs.” And yes, your abs are a big part of it. But your core is so much more than just that. Your core is the whole center of your body. It wraps around you like a wide belt and includes:

  • Top: Diaphragm
  • Front: Rectus abdominis, the “six-pack” muscle
  • Sides: Obliques
  • Deep layer: Transverse abdominis, the corset-like muscle that pulls everything in
  • Back: Multifidus and spinal erectors, the deep muscles that stabilize your spine
  • Base: Pelvic floor muscles

When all of these muscles work together, they protect your back and give you a strong foundation for every movement you do: walking, lifting, twisting, even just standing tall.

So, when someone says “engage your core,” what they really mean is “turn on the muscles that steady your middle,” so your body is strong and supported.

Are the Glutes Part of the Core?

Some people say the core is only your abs. Others include the glutes, too. So, who’s right? Well, in a way, both.

Technically, the core is your trunk (or the whole center of your body), but in real-life movement, your glutes are absolutely part of the picture. They’re some of the biggest, strongest muscles in your body, and they sit right at the base of your core.

Think of it this way: your glutes steady your pelvis from below, while your abs and back muscles steady your spine from above. If one group slacks off, the other has to pick up the load. That’s usually when pain, weakness, or poor movement patterns show up.

That’s why I almost always pair core work with glute work in my training plans. They’re teammates, and training them together gives you a stronger, more stable foundation.

Four Simple Steps to Engaging Your Core

If you don’t know how to engage your core, your body will find shortcuts. That usually means putting pressure on your lower back, your neck, or your hips. Over time, those shortcuts can cause severe pain or injury and slow down your progress.

Here’s a beginner-friendly way to feel your core working.

Step 1: Find Your Core

Start in whichever position feels most comfortable for you; lying down with your knees bent and feet flat, or sitting tall in a sturdy chair with both feet on the floor.

  • Place one hand on your stomach just below your belly button.
  • Take a slow breath in through your nose and feel your stomach rise.
  • Exhale slowly through your mouth like you’re blowing through a straw.
  • As you exhale, gently tighten your stomach, like bracing for a light poke.

You don’t want to suck your stomach in, and you don’t want to push it out. You just want to feel a gentle firmness under your hand. That’s your core switching on.

Practice this a few times with your hand there. Notice the difference between when it’s “off” and when it’s “on.” That awareness is key.

Step 2: Add Breathing the Right Way

One of the biggest mistakes people make is holding their breath when they try to engage their core. Your core should support you while you breathe, not stop you from breathing.

Here’s how to practice:

  • Inhale through your nose. Let the air fill your ribs so they expand slightly to the sides, not just lifting your chest.
  • Exhale through your mouth. As you breathe out, keep that gentle stomach brace, like you’re saying “sss” through your teeth.
  • Hold the light tension. At the end of your exhale, your stomach should still feel firm under your hand.

Practice this a few times until you can keep your core gently engaged without holding your breath. It might feel a little awkward at first, but with practice, it will start to feel natural.

Step 3: Check Your Core in Different Positions

Once you can feel your core working, try it in other positions. This helps you connect the skill to both regular daily life and exercise.

Standing up:

  • Place your feet about hip-width apart, so there’s a little space between them.
  • Imagine a string gently pulling the top of your head toward the ceiling. This will help you stand tall without leaning forward or backward.
  • Relax your shoulders down, away from your ears.
  • Inhale, then exhale and gently tighten your stomach.
  • You should feel steady, like you could resist a gentle push from the front.

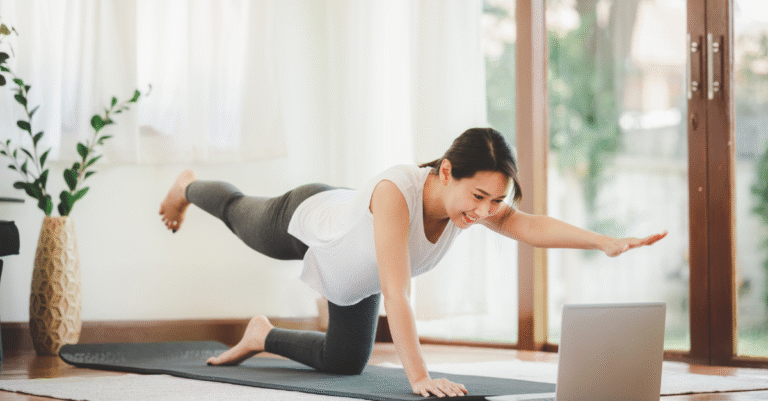
On hands and knees, if comfortable (this is a great test):

  • Start with your hands under your shoulders and your knees under your hips, like a tabletop.
  • Imagine someone set a full cup of iced coffee on your back; you don’t want it to slide or spill.
  • Keep your neck in line with your spine by looking a few inches in front of your hands, not tucking your chin or lifting your head up.
  • Inhale, then exhale and gently tighten your stomach.
  • Try not to let your back sag toward the floor. Your core should feel like it’s holding your spine steady.

Engaging your core isn’t just for workouts; it’s a skill you can use standing in line at the store, sitting at your desk, or moving through your day.

Women on GLP-1 working out at home virtually

How to Know if You’re Really Doing It

Here is how to tell if your core is engaged the right way:

  • Your stomach feels gently firm, like you’re bracing for a poke. It shouldn’t feel sucked in tight or puffed out hard.
  • You can still breathe and talk while keeping some tension. If you’re holding your breath, your core isn’t working the way it should.
  • Your back feels supported, not arched, sagging, or pinched.
  • Your posture feels taller, like your spine is being lightly lifted, not slouched or collapsed.
  • Small movements feel steadier and more controlled, whether it’s lifting an arm, standing up, or shifting your weight.
  • Your hips stay stable; they don’t rock side to side when your core is “on.”

Red flag check: If your neck, shoulders, or lower back are working overtime, it usually means your core has “turned off” and those other muscles are trying to take over.

How to “Find” Other Muscles Too

Core awareness often leads to muscle awareness everywhere else. A helpful trick is to notice what your body does before you engage, then compare how it feels when you line things up and turn a muscle “on.”

  • Glutes (butt): Stand like you normally do and notice what your hips and knees are doing. If your knees tip inward, your glutes aren’t doing much. Point your knees forward and keep them in line with your second and third toes. Press through your heels, as if you’re pushing the ground away from you. Squeeze your cheeks like you’re holding a $100 bill you don’t want to drop. You should feel your glutes kick on.
  • Lats (sides of your back): Let your arms hang loosely at your sides and notice how relaxed everything feels. Now press your elbows gently into your sides, like you’re holding a thick stack of paper there. You’ll feel the muscles along the sides of your back, just under your armpits, tighten; that’s your lats.
  • Quadriceps or Quads (front of thighs): Stand tall and notice if your legs feel soft. Now press your feet firmly into the floor as if leaving footprints. Your thighs should tighten right away, waking up your quads.

The more you practice comparing “before” and “after,” the easier it is to notice when a muscle is on, and when it’s not doing its job.

Why It Feels So Hard to Learn Alone

Learning to use muscles you’ve never really paid attention to is like learning a new language. You don’t just read the rules once and instantly speak fluently. You need practice, reminders, and feedback to feel confident.

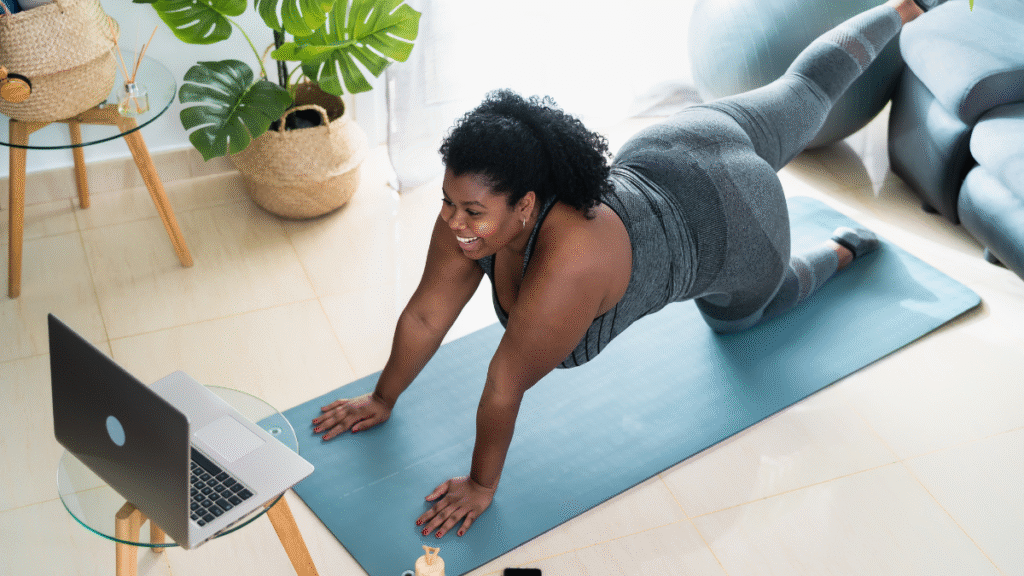
When you’re in a group class or following a video, the instructor can’t see what your body is actually doing. You might think you’re engaging your core when, in reality, you’re holding your breath or arching your back without noticing. That’s why it often feels so frustrating to figure out on your own.

One-on-One Training Can Make It Easier

Working with a trainer gives you the personal feedback you can’t get from a screen.

A trainer can:

  • Watch your body and let you know right away if your core is “on.”
  • Give you cues that make sense to you, not just generic phrases.
  • Remind you to breathe at the exact moment you tend to forget.
  • Adjust movements so they fit your body instead of forcing you into a one-size-fits-all plan.

That kind of attention makes it so much easier to actually feel your core working and build strength the right way.

The Takeaway

Engaging your core isn’t about doing more crunches; it’s about learning how to steady and support your body in daily life. Once you know how to “switch it on,” every movement you do becomes stronger and safer. If you’d like help making this second nature, that’s exactly what I guide women using GLP-1s through in private training.

If you have any questions or would like to suggest other topics that you’d find helpful, reach out. I’d love to hear from you!


Photo Credits

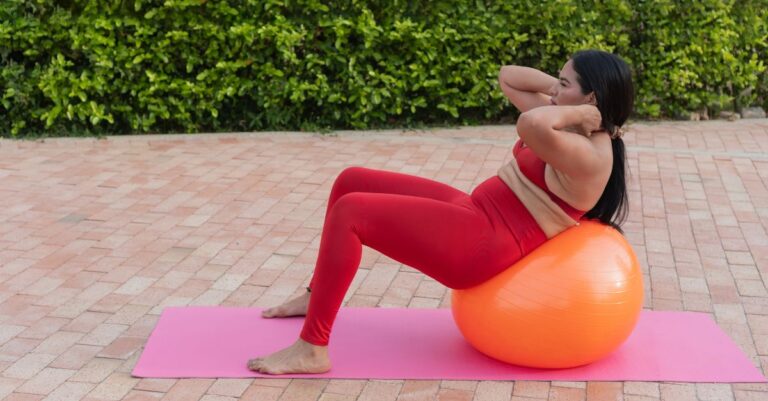
Woman performing crunches with an exercise ball outdoors by Imágenes de Hector Pertuz

Woman Doing Virtual Fitness Training at Home by Alessandro Biascioli

This article is for educational purposes and is not intended to replace medical consultation. Always consult a healthcare professional before making health-related decisions.

Read the full disclaimer here. 

Editorial Note: Portions of this article were supported by editorial tools, including AI. All content is researched, written, and reviewed by Claudia Dzina, CPT, before publication.

The Remedy Method

Most exercise programs focus on what to do.
This work focuses on helping your body feel steady and capable again as it changes.

Training is guided, intentional, and paced to support strength, balance, and confidence in real life, not just workouts.

If your body feels different and you’re not sure where to start, this is a supportive place to begin.

This is where it begins.

Share a bit about where you are so I can meet you there with the right kind of training support.

Is The Remedy Method
Right For Me?

(Find out in less than 1 minute!)

Answer a few quick questions about how your body feels and how you like to exercise. This will help you see if The Remedy Method, which blends corrective exercise, Pilates-style control, and strength training for women on GLP-1 medications, is a good fit for you.

1. Are you currently using a GLP-1 medication?

2. How often do you notice nausea, dizziness, low energy, or fast fatigue during movement?

3. Have you noticed changes in your balance, coordination, or stability since your body started changing?

4. Do certain movements feel awkward or disconnected now, like squats, lunges, bending, stepping, or getting off the floor?

5. Do you notice any of these when you move or exercise? (Select all that apply.)

6. Do you feel comfortable exercising in a public gym or group class?

7. Does the idea of guided instruction sound helpful right now?

8. Have you ever felt rushed, judged, or misunderstood by past trainers or programs?

9. What matters most to you right now? (Select all that apply.)

10. Do you want a structured plan with phases that build on each other?

11. Can you commit to training at home with simple equipment or none at all?

12. Would you benefit from having a trainer watch your form and guide your pacing in real time over Zoom?

This quiz is for education and reflection. It is not a medical screen or diagnosis. Always follow the guidance of your medical team for movement and exercise.

GLP-1 Nutrition
Reflection Tool

A quick check-in on your last meal and today’s patterns so you can see what your body might be asking for next.

Step 1 of 4
Think of your last meal. How many different colors were on your plate?
Where did most of the color come from?
What was the main protein in your last meal?
How was that protein prepared?
How many sides did you have with that meal?
What best describes your sides? (Choose all that apply.)
How were your sides prepared?
What was the main starch or grain at your last meal?
How much of your plate did that starch or grain take up?
Which of these were part of your last meal? (Choose all that apply.)
About how long did it take you to eat your last meal?
What were you doing while you ate?
Where did your last meal come from?
How long did it take to get that meal from “I’m hungry” to “let’s eat”?
How easy was this meal to put together?
Were you able to finish everything on your plate?
How did you feel 30–60 minutes after that meal?
So far today, how many different fruits have you eaten?
So far today, how many different vegetables have you eaten?
How many times have you reached for a snack today?
Which of these sounds most like your typical snack today?
What color were most of your drinks today?
Did you add anything to your drinks to make them taste better?
In the past week, how often have you felt too full to finish a small or normal-sized meal?
In the past week, how often have you felt nausea or strong discomfort after eating?
In the past week, how often have you gone more than 5 waking hours without eating anything?
Thinking about a typical day, how do your meals usually look?
Over the past week, how has your sleep been?
Do you have any kind of evening wind-down routine?
Your GLP-1 Meal Reflection
What this might be telling you
Optional: next-step ideas

    BMI & Waist Check

    Use this tool to look at your Body Mass Index (BMI) and waist size.

    BMI compares your height and weight to estimate general body size. It does not measure fat or muscle and cannot show how your body is changing with strength training or GLP-1 use. It is simply a numerical estimate.

    Waist size provides additional information because abdominal fat is more closely linked to metabolic risk than fat stored in other areas. Measuring the waist gives a better idea of where the body is holding weight.

    Both BMI and waist size can change quickly when someone starts a GLP-1. Muscle, water, and fat often shift at different rates, so these numbers work best as general reference points rather than something to obsess over.

    This tool gives you a simple snapshot you can use for your own self-awareness or just to know before doctor’s appointments. It’s one of several things to pay attention to, along with movement quality, strength levels, recovery, and daily well-being.

    Waist size is optional. The tool will still calculate your BMI if you skip that section.

    BMI Categories:


    • Underweight: Below 18.5
    • Healthy weight: 18.5 – 24.9
    • Overweight: 25 – 29.9
    • Obese: 30 or greater
      • Class I (Mild): 30–34.9
      • Class II (Moderate): 35–39.9
      • Class III (Severe): 40 or greater

    Unit of measure

    Sex

    Age (years)

    Height (feet)

    Height (inches)

    Weight (pounds)

    Waist circumference (inches, optional)

    This tool is for education only. It cannot diagnose medical conditions. If you have new symptoms or health concerns, talk with your medical team for guidance. For adults only. BMI is one data point and does not reflect muscle, body composition changes on GLP-1s, or overall health.

    Is The Remedy Method
    Right For Me?

    1. Are you currently using a GLP-1 medication?

    2. How often do you notice nausea, dizziness, low energy, or fast fatigue during movement?

    3. Have you noticed changes in your balance, coordination, or stability since your body started changing?

    4. Do certain movements feel awkward or disconnected now, like squats, lunges, bending, stepping, or getting off the floor?

    5. Do you notice any of these when you move or exercise? (Select all that apply.)

    6. Do you feel comfortable exercising in a public gym or group class?

    7. Does the idea of guided instruction sound helpful right now?

    8. Have you ever felt rushed, judged, or misunderstood by past trainers or programs?

    9. What matters most to you right now? (Select all that apply.)

    10. Do you want a structured plan with phases that build on each other?

    11. Can you commit to training at home with simple equipment or none at all?

    12. Would you benefit from having a trainer watch your form and guide your pacing in real time over Zoom?

    This quiz is for education and reflection. It is not a medical screen or diagnosis. Always follow the guidance of your medical team for movement and exercise.

    Movement Pattern Starting Point

    Answer these questions about how your body feels today. This tool helps you find a safe starting point for key movement patterns if you are using GLP-1 medications or coming back to exercise after weight loss. The goal is to match your body to the right level of support, not to push through pain or fear.

    1. How do your knees feel when you walk, use stairs, or stand up from a chair?

    2. How does your low back feel today?

    3. How steady do you feel on your feet?

    4. Can you safely get down to the floor and back up on your own?

    5. Any foot or ankle pain when you walk or stand?

    6. Right now, how confident do you feel about moving your body?

    This tool is for education only. It cannot diagnose injuries. If you have strong pain, falls, or new symptoms, talk with your health care team before starting or changing your exercise plan.

    GLP-1 Training
    Readiness Check

    Many women notice changes in balance, coordination, and strength as they lose weight. This tool helps you choose movements that feel supportive instead of stressful, so you can build confidence and avoid overloading joints or overworking muscles that are still adjusting.

    1. Have you eaten a small meal or snack in the last 2 to 3 hours?

    2. How is your stomach right now?

    3. How is your energy right now on a scale from 1 to 10?

    4. Have you felt dizzy, faint, or lightheaded when you stand up today?

    5. Any new sharp pain, chest tightness, or trouble breathing since your last workout?

    This tool is for education only and does not replace medical advice. If you ever feel unsure, choose rest and contact your health care team.

    Macro Split Calculator

    Enter your daily calorie target and choose your goal. This tool shows you how to divide your required calories into protein, fats, and carbohydrates. This breakdown is called a macro split, and it helps you understand where your energy is coming from each day.

    For women on GLP-1 medications or in active weight loss, a balanced macro split can make eating feel easier. It helps you stay fueled, support muscle, and avoid the big highs and lows that can happen when appetite is low.

    Most people feel their best with higher protein, moderate fats, and enough carbohydrates to support energy and recovery. A common place to start is around 30 percent protein, 30 percent fats, and 40 percent carbohydrates, though your personal needs may shift based on your appetite, training, and how your body feels.

    About the protein number: The protein number shown here may be higher or lower than the number from the daily protein calculator. That is expected.
    This tool uses a percentage of your calories, while the protein calculator uses your body weight to set a muscle-protective minimum.

    How to use both together: Follow the protein calculator for your daily minimum.
    If this macro calculator shows a higher protein number and it feels doable, you can aim for it. If not, stick to your minimum and adjust carbs and fats around it.

    kcal

    You can use your TDEE number from the TDEE calculator or enter any calorie target your medical team or coach has given you.
    Use my TDEE Calculation

    Protein: 0 g per day

    Fat: 0 g per day

    Carbs: 0 g per day

    These macro splits are set for people using GLP-1 medications or going through weight loss. Protein is higher to help protect lean muscle and support fullness. Fats are set at a steady level to support hormones and absorption of vitamins. Carbohydrates stay high enough to support energy and movement. This is a starting point, not a prescription. Your medical team may adjust your needs based on your health, labs, and medication plan.

    Daily Protein Target

    Enter your weight and choose how often you strength train. The calculator will give you a daily protein range in grams. This range helps support muscle strength, recovery, and overall health.

    The RDA (Recommended Dietary Allowance) for protein is 0.8 grams per kilogram of body weight. That amount is the minimum needed for basic health, not for muscle protection or strength training.

    People may need more than the RDA when they are:

    • losing weight
    • using GLP-1 medications
    • strength training
    • trying to keep or build muscle
    • over age 35

    Because these situations increase your protein needs, this calculator uses 1.2 grams per kilogram as the starting point. This level is better for maintaining lean muscle, especially during weight loss.

    NOTE: This number is based on your body weight, which makes it the best baseline for protecting muscle during weight loss or while using GLP-1 medications. Treat this as your daily minimum.

    If the macro calculator shows a higher protein number, you can aim for it if it feels realistic with your appetite. If not, stay with this minimum and adjust carbs and fats around it.

    lb

    Recommended range:

    0 to 0 grams per day

    This range is an estimate based on body weight and strength training level. It is a guide, not a strict rule. Your medical team may adjust your protein needs, especially while you are on GLP-1 medication.

    TDEE & BMR Calculator

    Fill in your details to find your Total Daily Energy Expenditure (TDEE) and Basal Metabolic Rate (BMR).

    Your TDEE is the total amount of energy your body uses in a full day. This includes everything. Your workouts, walking, cleaning, daily movement, shifting posture, fidgeting, and even the energy it takes to digest your food.

    Part of your TDEE is your BMR. Your BMR is the energy your body needs for basic life functions like breathing, circulating blood, maintaining organs, and keeping your body temperature stable. This is what your body would use even if you stayed in bed all day.

    Understanding both numbers is helpful if you are on a GLP-1 or working on your health. Appetite can drop quickly, which makes it easy to undereat without noticing. Knowing your TDEE and BMR shows you how much fuel your body actually needs so you can keep your energy up, protect muscle, and support safe and steady fat loss.

    You can choose from three formulas to calculate these numbers. Mifflin-St. Jeor and Harris-Benedict use height, weight, age, and sex. Katch-McArdle uses body fat percentage if you know it. They use slightly different math equations, but they all estimate the same thing. Mifflin-St. Jeor is generally the most accurate for most people.

    lb
    in

    BMR: 0 kcal per day

    TDEE: 0 kcal per day

    These are estimates. Calculators may read low for people with more muscle and may not work well for people living with obesity. Use as a guide, not an exact number.

    Form-focused. Emotionally aware. Personalized support from the comfort of your home.

    Live Virtual Training Options

    Private, 1:1 via Zoom

    2 Sessions Per Week

    $35–$40 per session

    24 total sessions (12 weeks)

    Pay in Full:

    $840 ($35/Session)

    Best value. One-time payment. | 30-Day Money-Back Guarantee

    Pay Monthly:

    $320/month for 3 months ($40/session)

    Flexible plan.

    3 Sessions Per Week

    $35–$40 per session

    36 total sessions (12 weeks)

    Pay in Full:

    $1,260 ($35/session)

    Best value. One-time payment. | 30-Day Money-Back Guarantee

    Pay Monthly:

    $480/month for 3 months ($40/session)

    Flexible plan.

    Simple. Transparent. No surprises.

    Live, personalized training. No app. No gym. Support that adapts to your body and your life.